Pica 1/5th near scale Mustang build part one
Back in 2020 the start of Covid lock down I dug the Two 1/5th scale Pica kits I had tucked away in my garage One being the Mustang the other a Spitfire kit bought years earlier, as I had just completed a 1/6th Mick Reeves MK16 spitfire I choose to start the Mustang, some two years later I got to run up the Moki 210 Engine in the garden.. so here are pics taken during my build not blow by blow, Maybe not in the correct order, I spent hours looking at Mustang pics & forums and I came across a complete Mustang Build topic on RCU build by Szempruw
link I found this to be of great help during my build, I know much about Spitfires, Hurricanes & Wyverns etc, If you read my blog of models I have built & they have all flown.. Very little Knowledge regards Mustangs I never intended to do as much detail as I have, although the cockpit is very sparse as regards all the levers & trimmings can't be seen in the air or from 5 mtrs static Judging.. I once spent a long time doing a Spitfire Cockpit turned out as I had not submitted a photo the two F4c judges were not interested the only F4c comp i have entered .. others Being Clubman, F4H, and Standoff scale... Adding a few rivets or screws I could not help myself as it does change from a toy plane to a near scale model one.. I have tried to make my model look like Kermit Weeks version of Cripes A' Mighty 3rd.. The weight of this model with the Robart Pneumatic retracts + 51/2" wheels all up = is 22lbs Cg 1.5" back from plan, others recommend 1 inch in front of the main spar, the author of the plan put the cg nose heavy for the Inexperienced pilot I read, add to that a full tank of fuel at the forward tank position I believe would make flying difficult it may fly?.. Because those with a very much
rearward CG DON'T for long.😢.
After starting this Build I discovered my son had just purchased A 3D printer,😊 I seconded him into making scale printed parts the radio & battery Gunsite Prop & spinner + I got him to make parts for a friends Typhoon build, all the parts are his first efforts, He's the wiz not me, Thankyou son.
Apology for the strange arrangement of the images for some reason they don't stay in place when setting out draft , ie neat layout and order did mange a few 3in a row then the layout fought back???.. Click on Images to Enlarge..... To read other posts Click on More posts
 |
| ---------------------------------------------------------------------------------------------------------------------------- |
Actually above, this is the 1/6th scale version built by Dave Knott as a club model, He confirms it flies really well cg is back 1.5 inches from plan position..
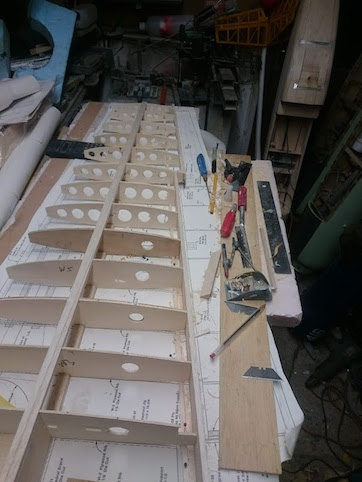
The following photos are of the build,I started with the rudder & fin a lot of lighting holes. Rudder & fin simple jig to for litho plate trim tab actuator, the 1/5th scale Pinking shears made by a club mate for Dave Knott's Hawker Hurricane F4c model rib tapes, I borrowed them when I found out the Mustang rudder has doped fabric covering on it .

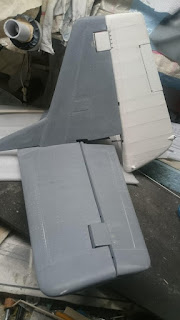 Rib tapes added to rudder, Tail plane & elevator completed too
 framing up the fuselage as per instructions
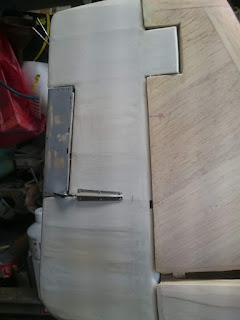
Next job is support & invert the top fuselage Add top formers & engine bearers, 3/8" wing seatLeft photo of tail wheel retract assembly made after reading though the RCU Mustang topic by
Szempruw, temporary fitting position of my version
Tail wheel former made from 3/8" ply note slots for closed loop steering.
Not over happy with the cowl so decided to split the cowl below the spinner & fair in the top using 3/4 balsa planking rough shaped section on the bandsaw, temporary fixed engine and 140 mm dia spinner sanded balsa to match contour
stainless steel silencer homemade actually it was for a Hawker tempest but rehomed here,
balsa rebated to flush fit lower cowling I did this mod before I checked out where the panel line were
next stage is the removable air scoop build and hollowing out the blocks of balsa as this part covers the wing bolt access
I also opted to open up the rad & oil cooler vents
The next action is to make the scale panel louvers to help ventilation as i did not like the kit version ..


 |
| Balsa rebated to flush fit vent |
for some reason the images won't place 3 inline
Next job was the
exhausts theses from carbercomposits.com Marking out positions on fuselage cut out to insert covers, I fixed in position though the 3rd exhaust outlet using hex drive servo screw.
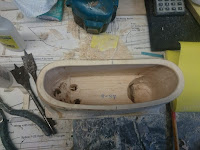
Blue foam called into action to shape molding for instrument panel using epoxy carbon cloth
 |
Callie graphics Instrument panel
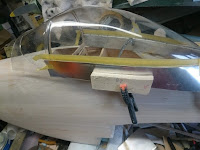
The start of making opening canopy after much debate, I started the internal frame using Balsa and carving to shape It's not easy !! & again using idea's from the RCU forum.. I completed all the cladding in litho plate and temp fixed the complete canopy on the fuselage before separation for that purpose a fine blade razor saw was used ..
|
 |
| side panel template |
 |
| canopy glue used to attach pane |
 |
| test fit |
 |
| the front section was screwed in place |
 |
| These parts 3D printed by my son |
 |
| End result Battery & radio.. |
 |
| rear spar added |
 |
| joining both halves |
 |
flap
|
 |
| RRDS for flaps hard laminate lined ply box |
 |
| start of wing sheeting 3/16" balsa |
 |
| pushed for space here |
 |
| Shear webbing both side of main spar out to wing tips flap & aileron & retract unit temp fitted, Ribs reinforced around retract mounting |
 |
| Marking parcel tape to lay up carbon fibre doors |
Wing sheeting top first then turned over bottom sheeted using kit jigs for washout..
 |
Door cut to shape position marked on balsa
ready for opening up wheel bay
|
 |
| carbon lay up curing Resin |
 |
| Door Air ram ball link connector |
 |
| litho, wheel rub protector |
 |
| Outer & inner door |
 |
complete wing including wing tips
2oz glass cloth then one coat epoxy resin light sand smooth then rattle can spray several coats
high build acrylic sanded using wet & dry between coats to a finish ready for panel line tape 0.005 chrome nail striping tape (bought via that well known auction site) next another coat of std primer when dry sand back to reveal tapes add any rivets raised or spot welded .. use a pin to tease out an tape end pull back on itself and admire the results you may wish to leave tapes, Choices choices.. Door and air ram in place with bit of fiddling.Below is the tail wheel that was purchased from Dave Tilbury bespoke parts items available here link. |
problem loading photos now so going to be a part Two..
Here


 Next job is support & invert the top fuselage Add top formers & engine bearers, 3/8" wing seat


 Rudder & fin simple jig to for litho plate trim tab actuator, the 1/5th scale Pinking shears made by a club mate for Dave Knott's Hawker Hurricane F4c model rib tapes, I borrowed them when I found out the Mustang rudder has doped fabric covering on it .


Comments
Post a Comment